Why I Use Linux
I am using a closed-source browser as I type this. Like Linux, it just works for me. It gets out of my way and lets me accomplish my computing goals.
I love the simplicity and efficacy of the terminal. When I boot my computer, a terminal emulator is one of the first things I open. I often have two or three of them open at once.
Using The Linux Find Command:
this link (which will save me the time of repeating it). Seriously, read it. It’s well worth the read. So, how did we get here? [code]ls -la | grep iso[/code] I could have output them to a handy text file for storage with: find‘ command. Using ‘find’ is a bit more complex, but it’s worth learning how to use it. cpio‘, which oddly didn’t appear in Unix until Version 7. The cpio was all about archiving and actually still exists though you’ve probably never used it.
I wanted to list the .iso files in the directory and so I ended up with this command: -iname
Have you ever wanted to know how long it takes to complete a command that you entered in the Linux terminal? Well, wonder no more! [code]ls -la[/code] time‘ command before it. Time is simply described in the man page as: [code]time ls -la[/code] Note how it tells you the time beneath the results and, if you want to try something bigger, you can take a look at this command: The output at the end is something like this: real 0m0.566s
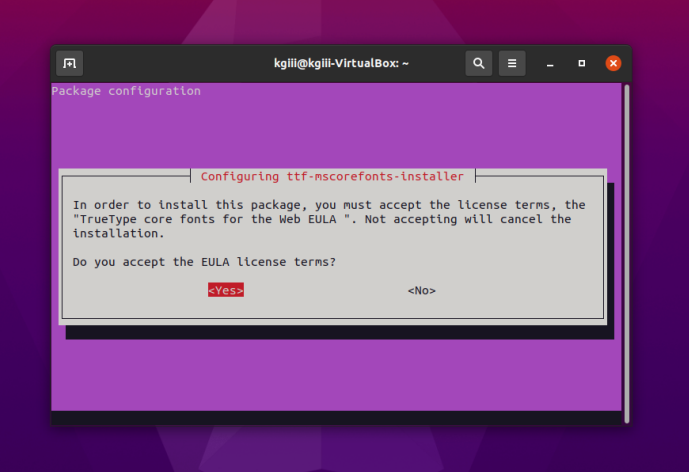
As I trawl the ‘net, I see some confusion about the Ubuntu Restricted Extras package. This post is meant to clear up any confusion. Given the nature of the beast, I assume this is also valid for Ubuntu derivatives – but I’ve not explored all of them personally (and there are many). So, what’s in the package? It’s a package with more than one thing in it and will also download (if allowed) more data along the way. This is what’s inside: gstreamer0.10-ffmpeg Basically, it’s a bunch of fonts, codecs (so that you can play patent-encumbered media files), and the ability to open .rar compressed files and use Java applets in the browser. It’s some handy stuff, but because it’s all non-free Ubuntu doesn’t include it by default. Indeed, you won’t even find it unless you enable the ‘multiverse’ repository, like so: [code]sudo add-apt-repository multiverse[/code] Then, you’ll need to make sure that your system knows (though some more modern releases will do this automatically) about the new software choices. [code]sudo apt update[/code] Follow that up with: [code]sudo apt install ubuntu-restricted-extras[/code] That’s going to download a bunch of stuff and show a screen that trips up a lot of newer users. There’s no obvious way to use a mouse and, indeed, you have to use your keyboard to agree to the user agreement. It looks like this: It’s okay. Don’t give up! You can use your TAB (or arrows) key to make selections and use the ENTER button to submit your answers. You’ll do it again on the next screen. At that point, it’ll download some more files with fonts in them and extract them to the right directories so that you can use them. You’ll also be able to use the other included files/applications, though they are not ‘free’ in the sense of the license agreement (which is the reason they’re not included by default and you have to jump through hoops to install them). This is just a quick article that may show one of the reasons I write this material. We’re just going to put together a couple of pages from this site in an example of real-world use. So, if you remember, I told you how to use dpkg to get a list of installed applications. The command I used on that page was: [code]dpkg -l > Documents/installed_apps.txt[/code] Well, the output from that is more information than I really need. It looks like this: [code]ii abiword 3.0.2-6 amd64 efficient, featureful word processor with collaboration That’s plenty informative – but I want just the name of the applications. Sure enough, we can use ‘AWK‘ to do this. On that page, we have this command: [code]awk ‘{ print $2 }’ countries.txt > finished.txt[/code] So, let’s mix the two together! We can do that! Let’s see… I’ll obviously need to change the paths and file names. Coincidentally, I’ll not need to change the column (the bit about { print $2 }) because I still want the second column. What does it end up looking like? [code]awk ‘{ print $2 }’ Documents/installed_apps.txt > Documents/InstalledApps.txt[/code] Now, navigate to your documents folder and open InstalledApps.txt with your favorite text editor. You’ll see that it looks a bit like this: [code]abiword You’ll still have some unwanted text at the top of the page, but it works well enough to get the job done. It’s reasons like that which motivate me to write this material.How To: Use ‘find’ to List .iso files in a Directory.
awk‘ and ‘putting it all together‘. You just need to use a pipe and then ‘wc -l’. So, that command would look like:How To: Time a Command
user 0m0.423s
sys 0m0.143sUbuntu Restricted Extras
gstreamer0.10-fluendo-mp3
gstreamer0.10-pitfdll
gstreamer0.10-plugins-bad
gstreamer0.10-plugins-ugly
gstreamer0.10-plugins-bad-multiverse
gstreamer0.10-plugins-ugly-multiverse
icedtea6-plugin
libavcodec-extra-52
libmp4v2-0
ttf-mscorefonts-installer
unrar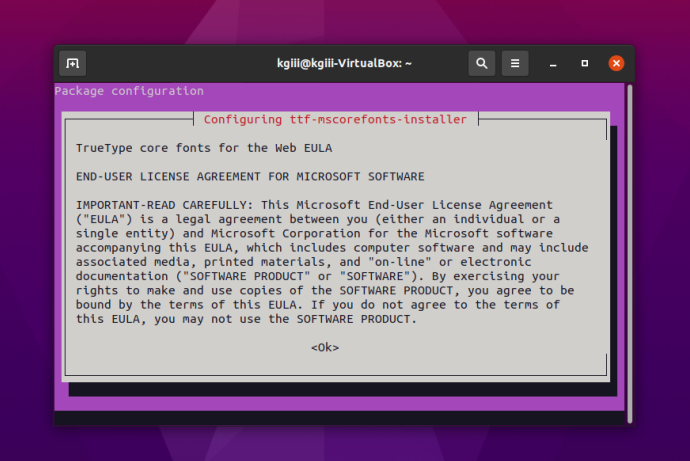
Put it all Together
ii abiword-common 3.0.2-6 all efficient, featureful word processor with collaboration — common files
ii accountsservice 0.6.45-1ubuntu1.3 amd64 query and manipulate user account information
ii ack 2.22-1 all grep-like program specifically for large source trees[/code]
abiword-common
accountsservice
ack[/code]