How To: Properly Install Proprietary Drivers in Ubuntu

There is some confusion about installing the proprietary drivers in Ubuntu. This article hopes to clear that up by telling you how to properly install drivers in Ubuntu.

First, this only works for the drivers that Ubuntu has access to. In this case, it’s usually things like graphics cards, sound cards, some networking gear, and things like that. 

Ubuntu does not have all the possible drivers. If you have to go get them from GitHub and compile them yourself, this obviously isn’t the article for you.

One of the most confusing is the Nvidia video card drivers. If you use Ubuntu, an official flavor of Ubuntu, or a derivative of Ubuntu, DO NOT download the .run file from Nvidia’s site. While it may work, it will quite possibly not work with dkms and you will have to spend significant time fixing it every time the kernel is updated. It quite likely lead to breakage. 

Yes, this means having some patience. But, have some patience because the drivers will make it down to the repos and will have then been tested. The drivers you get from the official repos will not only update, they’ll update with the rest of the system AND they’ll work properly with the kernel updates. When the kernel updates, the system itself will insert the appropriate drivers calls.

Doing this any other way will quite likely lead to hardship – and it’s a hardship that you don’t need to have. It’s a hardship that’s easily avoided. If you read the forums and question/answer sites, doing this the wrong way results in at least one question almost every single day.

The first way is easy. It’s even in the GUI. Search your menu for ‘Additional Drivers’ or similar (it may be only listed as “Software & Updates” depending on your Ubuntu flavor). It looks like this:
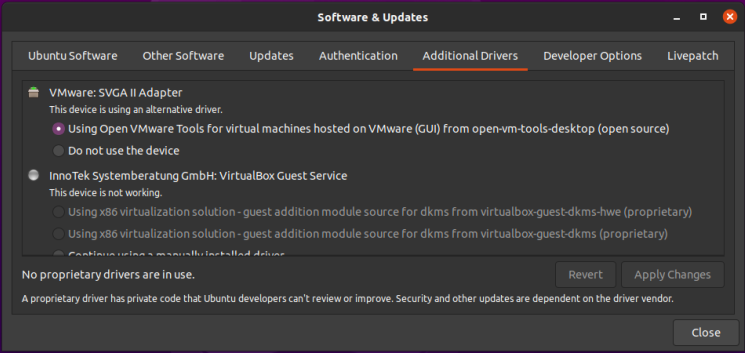
add additional drivers via gui
This should be self-explanatory, so I will just leave this here.

See? Pretty easy. Just pick what you want, apply the changes, and reboot.

NOTE: You will need to have the ‘restricted’ repository enabled in order to do this. That should be assumed, but some of you may not know this. So, a quick screenshot should make this even easier to figure out – it’s in the same app as the above screenshot, but it’s in the first tab. It looks a little like this:

The arrow should make it clear. That repo needs to be enabled for this.

The second way is to use the terminal. Let’s go ahead and get the terminal opened by pressing CTRL + ALT + T on your keyboard.

Now, let’s check and see what drivers we can automatically install from the terminal:

The output should let you know what drivers are available for your devices. Again, this is pretty self-explanatory. You really don’t even need to enter that command, you can do it all automatically and get the recommended drivers automatically installed. It’s easy. Just run this:

That will go through and install the recommended drivers for your devices automatically. That will install the proprietary drivers, the ones with binary blobs and decidedly not opensource drivers. If those are the drivers you want, that’s the easiest way to install them.

Simply run the command, reboot, and you’re done. Not only are you done, you shouldn’t have to mess with them again – ever again. They will update automatically, they will automatically be applied when you update the kernel, and they will generally just work.

For the time being, we’re ignoring the idea of using the opensource drivers. I’ll simply say that I do quite well without needing proprietary drivers. I hardly ever bother installing them – unless I absolutely need a feature that’s not offered with the opensource drivers. I find that it’s still a working operating system and I can still easily meet my goals. You do you and you make the decision, but at least do it the right way after making that decision.

As always, thanks for reading. There’s a newsletter that will email you when a new article is published. That’s all it does. If you’re wanting to keep up with the site, that’s exactly how you do it! Well, there are push notifications available for those that prefer that. So, you do have choices! Either way, I won’t send you any spam. I promise!

Smash a Button
[Total: 0 Average: 0]
About Me: I'm just some retired dude with a little bit more free time on my hands. If you want to support the site, why not help yourself out too by ordering some inexpensive web hosting so that you can start your own site?


How To: Check CPU Temperatures

This is obviously about Linux and, given that it’s Linux, there are often multiple ways to accomplish things. This is one way to check the CPU temperatures.

This one should be fairly short and straightforward. Once again, crack open your favorite terminal emulator with CTRL + ALT + T.

For this exercise, we’ll be using lm-sensors. Wikipedia helpfully describes it as thus:

lm_sensors (Linux-monitoring sensors) is a free open-source software-tool for Linux that provides tools and drivers for monitoring temperatures, voltage, humidity, and fans. It can also detect chassis intrusions.

It then promptly says that a citation is needed. 

So, let’s check the man page. man lm-sensors has no entry, so you’ll need the slightly less obvious man sensors. In this case, the description is not much greater.

sensors is used to show the current readings of all sensor chips. sensors -s is used to set all limits as specified in the configuration file. sensors –bus-list is used to generate bus statements suitable for the configuration file.

Alright, so let’s get this installed. 

So far so good, but now we need sensors to find the hardware and that’s done with this:

That’s going to run and it’s interactive. You’ll need to type “YES” over and over again and then finally hit the ENTER button. But, once you’re done, it’s all over and you never have to do it again – unless you add/change hardware that has sensors.

Now that it’s installed, you can just run:

If you are easily startled by the metric system, you can just add the -f switch for Fahrenheit, like so:


Congratulations! You can now easily tell how hot (or cold) your CPU is running. You should also look up your CPU’s temperature thresholds. This way you’ll be able to tell if your CPU is running hotter than it should be running. Doing this can save your hardware or give it greater longevity.

The newsletter works again. You can now sign up and get notified of new articles. It’s painless, and I promise I won’t send you any spam –  nor give/trade your email address with anyone for any purpose. (Frankly, I have zero motivation to do so.) If you had signed up previously, you’ll need to do it again, for I am lazy and there was no export and import options. Thanks for reading! (Also, I hope you like the font change!)

Smash a Button
[Total: 1 Average: 5]
About Me: I'm just some retired dude with a little bit more free time on my hands. If you want to support the site, why not help yourself out too by ordering some inexpensive web hosting so that you can start your own site?


Realtek RTL8192EU and Linux: It works!

Probably because I was scouring AskUbuntu and reading a number of complaints about getting their wireless device working, I decided to see exactly how difficult it was.

I have a computer that I use for testing and I mostly access it by VNC. It has an unused wireless dongle and I figured now was a good time to see if I can make it work. 

The first step was to turn it on. Believe it or not, it worked. It had a very, very weak signal even though it’s within a few feet of the router. So, I cracked open my terminal and entered:

inxi -Fc 0

Sure enough, I found this:

Device-2: Realtek RTL8192EU 802.11b/g/n WLAN Adapter type: USB

So, I turned to a search engine and entered:

Realtek RTL8192EU +Linux driver

I scanned the results and noticed that there was fairly recent (mid-2018) GitHub page here. So, I headed there to read what the author had to say.

Rather than playing around, I made sure I’d followed their directions:

sudo apt -y install linux-headers-generic build-essential dkms git

Except that’s not necessarily going to work, so I simply removed the -y.

sudo apt install linux-headers-generic build-essential dkms git

There. That’ll work. I mashed the enter button, entered my password, and I downloaded the .zip file from the top of the page while it installed. I didn’t really see any need to build it myself, nor did I want the git hurdles (even though I’d just installed it). So, I just downloaded it to /Downloads and then extracted it into its own folder.

Once that was all done, I entered the newly created directory and ran:

sudo ./install_wifi.sh

The sudo elevates my permission, the ./ tells it that I want the file in the directory I’m in, and the install_wifi.sh is the name of the script that will install the drivers automatically. It will take a few minutes, even on modern hardware, but it’s not a difficult task. If anything, it’s straightforward and intuitive.

I followed that up with a reboot and, sure enough, I was then able to use the driver and my signal strength was significantly higher. That’t it. That’s all it took. Does it seem hard? Probably. Once you’ve done it a few times, you’ll be used to it. Working in the terminal is one of the greatest things you can do with Linux. There’s no reason to be afraid of it. Just know what the commands are going to do before you go ahead and do them.

Smash a Button
[Total: 1 Average: 5]
About Me: I'm just some retired dude with a little bit more free time on my hands. If you want to support the site, why not help yourself out too by ordering some inexpensive web hosting so that you can start your own site?


Linux Tips

This work is licensed under a Creative Commons Attribution 4.0 International License.
SITEMAP
Exit mobile version