How To: Enable x11 Forwarding with SSH

In the last article, I explained how to enable SSH. In today’s article, we’re going to learn how to forward GUI application windows with SSH. x11 forwarding is easy and beneficial.

Just to quickly clear up a misconception, x11 forwarding works just fine with Wayland. Way back in the earliest days, it was agreed that it should retain backwards compatibility with x11 forwarding.

Enable x11 Forwarding With SSH

What is this strange thing, this x11 forwarding?

Well, when you’re connected to another computer via SSH you can use the terminal to control the computer. That’s great, but what if you want to use a GUI application? Sure, you could set up some sort of remote desktop application, such as VNC. Or, alternatively, you can just forward graphic applications over SSH. It’s remarkably easy!

Perhaps a picture is in order. Check this:

x11 forwarded gedit
This GEdit is actually running on my laptop, forwarded to this desktop.

That’s right. That’s running on my laptop. I’ve just forwarded the GUI application to this computer. If I write something and save it, it’d be saved on the computer that I’m connected to and not the computer that I’m using.

Amusingly, I used this just earlier today. I had to move a complex password to my laptop and I was being lazy. See? It comes in handier than you might think. Okay, I could have easily used nano, but I wanted to make sure that I’d configured x11 forwarding properly and get a screenshot.

So, how do you do it? 

Well, first you need to crack open your terminal. To do that, you just press CTRL + ALT + T on your keyboard and your default terminal emulator will open.

Now, in said terminal, I want you to run the following command:

Once you have that open, you just need to remove the appropriate asterisk (uncomment it out) for the right line. Look for the line that says:

And change it to:

Then save the file by pressing CTRL + X, then Y, and then ENTER.

Next up, you’ll need to restart the SSH service and that’s done with:

And that’s it. You can now use x11 forwarding over SSH. To do so, you just need to add the -X switch.

To try to make sense of that, if I were to do this connecting to the new MSI laptop, then my command would look just like:

You can also use the IP address, instead of the hostname, just like we discussed in the previous article about SSH. To do that, it looks like this:

Once you’re there, just go ahead and start an application. For example, open gedit by typing just that. You may find some applications won’t work, often due to ownership and permissions, but you’ll find many that do. If you find one that doesn’t work, you can always check any errors thrown and work to resolve the issue.

Firefox forwarded over SSH
See? Note the carefully drawn arrow that shows where it was forwarded from. Tada!

That’s an example of Firefox forwarded over SSH using x11 forwarding and you may notice the washed out look. I haven’t really dug into it, but I am reasonably confident that it’s because of compression. I’ve never needed to dig into that and, amazingly enough, I don’t know everything and don’t see any reason to invest time learning about it any further. You get what I know, not what I am able to learn! (You’re welcome!)

Anyhow, there you have it. One more article in the books and one more bit of knowledge plastered across the internet. If you found the article useful, you could use that rating button. I kinda use those ratings to decide what to write. You can also sign up for the newsletter. I had to remove some @gmx.com email address because they simply don’t let my emails through. (I’ve never sent a single unsolicited message, it’s just a horrible ccTLD and it gets filtered often.) Sign up again with a different email address. Thanks for reading!
Smash a Button
[Total: 2 Average: 4.5]
About Me: I'm just some retired dude with a little bit more free time on my hands. If you want to support the site, why not help yourself out too by ordering some inexpensive web hosting so that you can start your own site?


How To: Enable SSH

In today’s article, we’ll learn about enabling SSH. SSH is a useful tool for remotely managing your Linux computer. This is a pretty simple, painless, and quick exercise.

Let’s say your computer is in another room, another state, another country, or on another continent entirely. How are you going to manage it? After all, we have servers across the world and it is not even remotely economical to send a person to administer each one of them in person. 

On a home-use note, it’s perfectly suitable to manage my own router using SSH. It’s quick, easy, lightweight, effective, doesn’t require an attached monitor, and more. What’s not to like?

Installing SSH on Linux

My homemade router doesn’t have a keyboard attached. It doesn’t have a monitor attached, so it’s not like I can just easily walk over and deal with it.

I just got a new computer, a lovely laptop that I got for a fantastic price. I got it to test Lubuntu. I don’t always want to have to go over to the device and physically use it. 

I have a dedicated server in Las Vegas. I live in Maine. It wouldn’t be practical to fly out to Vegas every few days to run updates on the server. It wouldn’t make financial sense to go out there every time the server needed to be rebooted.

These are all great candidates for SSH. SSH stands for “Secure Shell” and it’s a protocol. It’s not an application, and you can use SSH for all those things. A great many applications can communicate over the SSH protocol, including every terminal emulator that I’m familiar with.

The man page defines SSH as:

ssh — OpenSSH remote login client

It has been around since the mid-90s and does nifty things beyond allowing you to control the remote system with commands, it also allows you to transfer files with things like SCP and SFTP. It’s right full of nifty features and you might as well become familiar with it. I’ll possibly cover both of those in a future article.

It’s very, very easy to get going. Simple use your keyboard to open the terminal, by pressing CTRL + ALT + T.

Now, simply type (this one can be easily adjusted to other package managers):

There… You’re done. Well, you are more or less done. You now effectively have SSH running. It starts itself after you install it. That’s pretty handy!

Now, make sure you’re on the same subnet, and you can connect to the remote computer – the computer where you just installed and enabled SSH. You can do that in a couple of ways. You can do it like this:

You can switch the obvious for the obvious, but you will need to know the IP address for the remote computer. That seems a bit tedious, so let’s just skip that part. Rather than remembering the IP address (which may change), just remember the name of the device.

So, instead, you’d run:

If that doesn’t make sense, this is how I’d connect to the new laptop:

Obviously, the hostname is ‘kgiii-msi’ and your hostname will be different. It’ll be the name you gave the computer during the installation process, typically during the same phase where you generated your user account. If you don’t actually know your hostname, you can easily find it. It’s simply:

There’s more to this and we’ll likely cover that soon enough, but that’ll get you started. If you have a firewall installed and enabled, you may need to let SSH through if you want to use it. This is such a simple thing that I’d be remiss in my duties to not make folks aware of how simple it is.

And, with that, I thank you my dear reader for taking the time out of your day to humor this old fool. Your feedback is appreciated and keep signing up to that whole newsletter thing. Being old, I tend to forget to submit and share these articles elsewhere. Signing up means you have no excuses for missing an article!

Smash a Button
[Total: 3 Average: 5]
About Me: I'm just some retired dude with a little bit more free time on my hands. If you want to support the site, why not help yourself out too by ordering some inexpensive web hosting so that you can start your own site?


How To: Turn Your Linux Box Into a WiFi Hotspot

Have you ever wanted to use your Linux computer as a wireless hotspot? It’s actually pretty easy. This article will get you started and it really isn’t all that difficult. We will actually be cribbing a bit of this article from the software’s homepage, but with some more information given.

Make a Linux WiFi Hotspot

For many years, I used my own router that I had made. It was built on Linux. The preceding version ran on BSD, but that’s not important right now. Today, you can get a NUC or Pi for dirt cheap and so making a new router is back on my list of things to do.

All of the varied software and hardware components are already there, but I want to enable wireless connectivity and that’s what we’re going to look at today. The tool we’re going to use is called ‘linux-wifi-hotspot‘ Which is a great tool, complete with GUI if wanted, written by lakinduakash. It has only been around for a few years, but it’s spoken of very highly and it just works and works well.

The software is easy enough to install. If you’re using Debian/Ubuntu, just add the PPA and install the software. To add the PPA, you just run:

On a modern OS, you shouldn’t need to do this, but you might want to go ahead and run a quick update with:

Then you can install the software. To do that, it’s just:

If you want, you can visit the link above, click on releases, and download the .deb file for the current release and just install it with gdebi.

If you’re using Arch (or Arch based distros) it looks like you can just go ahead and install it with:

It should be noted that I did not actually test that very well. I gave it a quick test in Manjaro and it said it couldn’t find all the required packages. Manjaro is not Arch, but based on it. I don’t have an Arch VM configured without doing some serious digging through my backups, so I am unable to confirm it.

Then, you can go ahead and start it. You can also go ahead and make it start at boot, which would be prudent if you intended to use this to make your own router. It’s really self-explanatory and without specific questions for using it, I’m just going to refer you to the man page and the information at the project page.

But, before you can even do all of this, you need to know that your wireless adapter actually supports doing this. To find out, you need to know if your wireless adapter supports “AP” mode. AP obviously meaning ‘Access Point’.

To check this, you need to run the following command:

The project page is noticeably silent with this, but it’s a necessary step. See, you need to know if your hardware actually supports it before you even bother trying. Come to think of it, I probably should have put this closer to the top of the page! I ain’t editing that!

Anyhow, the output should contain one or both of the following lines:

Device supports AP scan.

And/Or:

Driver supports full state transitions for AP/GO clients.

So long as you see one or both of those, you should be all set to proceed. If you don’t see either of them, there’s no software solution and you’ll need to get hardware that supports AP mode. In many cases, that’ll mean doing a bunch of research and may even mean contacting the vendor or OEM.

Nobody appears to have compiled a list of hardware that supports AP mode and I don’t think I’ve ever bought wireless adapters that explicitly stated they do on the box. As near as I can tell, more modern adapters support it just fine, so you’ll probably be alright.

Alright, there’s your article for the day. I have no idea if you want to make a WiFi hotspot for your Linux box, but now you know how. Thanks for reading and don’t forget to sign up for the newsletter. Also, if you rate the articles I’ll be able to see the kind of content you prefer. That’d probably be beneficial.

Smash a Button
[Total: 0 Average: 0]
About Me: I'm just some retired dude with a little bit more free time on my hands. If you want to support the site, why not help yourself out too by ordering some inexpensive web hosting so that you can start your own site?


Let’s Spin up a Quick Python Server!

Today we’re going to use a basic Python server to share files between multiple computers both quickly and easily, by using tools you likely have by default.

First, let’s set the stage…

You’re eight beers deep while sitting on your couch and playing with virtual machines. You have already downloaded the latest and greatest distro – but it’s way over on your desktop and you’re both lazy and not too sure about your walking ability!

What to do? What to do?

Sure, you could just download the file all over again – but you’re aware of how much the project pays for bandwidth and you’re inebriated enough so that if you don’t do it right now then it just might not get done! So, you need that file and you need it with a quickness!

I’m going to make a huge assumption here. Someday, I’ll write an article explaining how, but for now we’re going to assume that you have SSH (secure shell) enabled on your desktop (in this scenario) and that you know how to use it. So, it’s with a giant assumption and a leap of faith when I say that you’ve successfully used SSH to get to your desktop and you’ve already navigated to the directory where this latest and greatest distro image resides.

NOTE: If you don’t have SSH enabled, surely you have access to a search engine. Go figure it out! Eventually I’ll write an article about it, but there are already hundreds of tutorials already out there.

Anyhow, sure… You’ve used SSH and now you could transfer the file with SCP (secure copy protocol) if you wanted. That’s all well and good, but darn it we’re aiming for the most contrived situation possible just so I can tell you how to spin up a server with Python! So, for whatever reason, you’re hellbent on doing this in your browser. And do this in your browser you shall!

Yeah, there are a ton of ways to transfer files – many (perhaps all) of them better than this! Though you could also use this for testing your HTML and CSS skills. So, there’s that! By the way, if my contrived scenario isn’t good enough for you, you can make up your own reasons to do this. If your ideas are any good, you can even contribute to the site!

Anyhow, you’re now connected to that desktop with SSH and you’re in the directory where you store those important files. Now that you’re there, run the following command:

If you’re using Python 1x or 2.x you should probably update, but the magic server command is this:

If you’re using Python 3.x then the command will be:

For the record, the ‘-m’ is telling Python which module to load. Either way, you can now open your browser and enter this tidbit in the address bar:

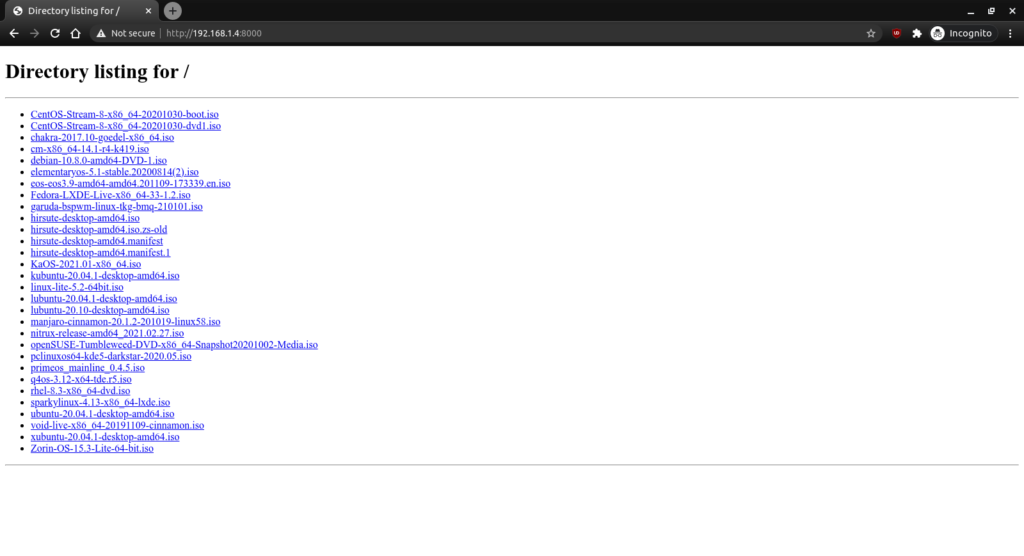
Obviously you should adjust it accordingly. If you’ve done it right, it should look similar to this:

You're effectively running a simple server.
Obviously it will not look the same for you. It’ll have your files!

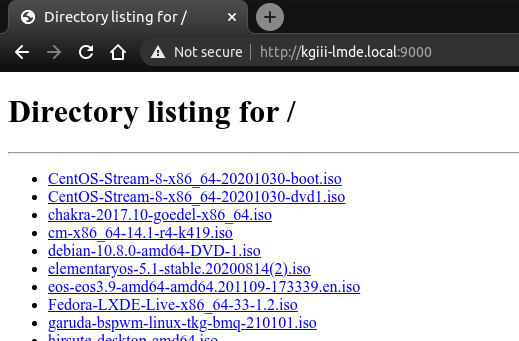
If you want, you can also connect via the hostname. In the above example, the computer I was connected to is known as ‘kgiii-lmde’ and you need only add the .local for this to work. See the image below:

access by hostname
See? No IP address required! You can also use this for the above mentioned SSH!

Now, if you want to do so, you can also change the port number. This is the same for both commands. In both cases, just add your chosen port number at the end. Like so:

And, again, it should look a bit like this:

See? It's a different port number.
Note the changed port number. You should probably avoid reserved ports.

Anyhow, you can use this for all sorts of things. You can now navigate the user’s files with a web browser. If you’re really insane, you can make this available over the internet by enabling port forwarding – but I’m gonna suggest you not do that. If you’re going to do that, you should probably use something more robust and with much finer permission controls. It’d also take quite a bit of work to turn this into a server that’d do anything more than offer up static files. I suspect (but don’t know) that it’s about as secure as a screen door, so putting this on the public web would just be silly. Don’t do that.

Though my written use-case was very contrived, I find myself using this easy server fairly regularly. I actually prefer to use FTP to move files between computers, but I’ll spin up a quick Python server so that I can grab things like config files and whatnot. Believe it or not, even wget works. In this instance, if I wanted to grab that Debian ISO, I could just do this:

So long as the server is up and running, wget works. Granted, there’s not too many contrived situations where I’d need to use wget on top of all this – but it’s fun to play with and educational.

What sort of uses can you come up with? Feel free to leave them as comments below. Who knows? Maybe they’ll end up being motivations for future articles?

As always, thanks for reading. Don’t forget to sign up for the newsletter. Chances are good that I’ll not always be on the forums and this is a way for you to keep track of what gets published. I also won’t send you any spam, nor will I trade/sell/give your email address to anyone.

Smash a Button
[Total: 2 Average: 5]
About Me: I'm just some retired dude with a little bit more free time on my hands. If you want to support the site, why not help yourself out too by ordering some inexpensive web hosting so that you can start your own site?


Is my Internal IP Address Static or Dynamic?

In the days of modern internet connections, you’re almost certainly using a router. Routers are different and may offer you a static or dynamic internal address for use on your LAN. This article will tell you how to tell the difference between a static and dynamic IP address using the Linux terminal emulator.

So, I’m going to assume you know what an IP address is. It’s basically the numbers used to indicate a specific computer, though it’s a bit more complicated and you can read the Wikipedia page on IP addresses if you want a more detailed explanation.

A dynamic IP address is an IP address that changes from time to time. A static IP address is one that doesn’t change. The first one will be different after a set amount of time or events, the second one will always be the same.

The benefits of a static IP address are many, chief among them is consistency. This is true even on a LAN (Local Area Network). If you don’t recall the device name, you can easily access it by IP address. If the device doesn’t have a hostname, you can access it by IP address, and the address doesn’t change.

The benefits of a dynamic IP address are pretty much none, unless you’re a provider who wants to rotate through them because of constantly changing devices. For you my delightful reader, in your realistic use-cases, there are no real benefits to having a dynamic IP address. They’re a great idea when you have more devices than you have IP addresses – which is very unlikely to be true if you’re reading this site for Linux tips! 

NOTE: Your Linux distro probably happily works with .local. So, if you have a dynamic address you can still access it through hostname.local. For example, this computer is ‘kgiii-desktop’ and I can access it with ‘kgiii-desktop.local’ easily enough.

Anyhow, it’s pretty easy to tell. The first thing you need to do is crack open your terminal. You can do this by pressing CTRL + ALT + T. Then, just enter:

Now, just look for ‘valid_lft’ and you’ll have your answer.

If it’s a dynamic IP address you’ll see something similar to this:

If it’s a static IP address, you’ll see something similar to this:

See? I told you that it was pretty easy! Now that you know, you can easily check and act accordingly. As always, thanks for reading. Don’t forget to sign up for the newsletter. You’ll get an email when a new article is published and make an old man happy!

Smash a Button
[Total: 1 Average: 4]
About Me: I'm just some retired dude with a little bit more free time on my hands. If you want to support the site, why not help yourself out too by ordering some inexpensive web hosting so that you can start your own site?


Linux Tips
Creative Commons License
This work is licensed under a Creative Commons Attribution 4.0 International License.
SITEMAP