How To: Properly Install Proprietary Drivers in Ubuntu

There is some confusion about installing the proprietary drivers in Ubuntu. This article hopes to clear that up by telling you how to properly install drivers in Ubuntu.

First, this only works for the drivers that Ubuntu has access to. In this case, it’s usually things like graphics cards, sound cards, some networking gear, and things like that. 

Ubuntu does not have all the possible drivers. If you have to go get them from GitHub and compile them yourself, this obviously isn’t the article for you.

One of the most confusing is the Nvidia video card drivers. If you use Ubuntu, an official flavor of Ubuntu, or a derivative of Ubuntu, DO NOT download the .run file from Nvidia’s site. While it may work, it will quite possibly not work with dkms and you will have to spend significant time fixing it every time the kernel is updated. It quite likely lead to breakage. 

Yes, this means having some patience. But, have some patience because the drivers will make it down to the repos and will have then been tested. The drivers you get from the official repos will not only update, they’ll update with the rest of the system AND they’ll work properly with the kernel updates. When the kernel updates, the system itself will insert the appropriate drivers calls.

Doing this any other way will quite likely lead to hardship – and it’s a hardship that you don’t need to have. It’s a hardship that’s easily avoided. If you read the forums and question/answer sites, doing this the wrong way results in at least one question almost every single day.

The first way is easy. It’s even in the GUI. Search your menu for ‘Additional Drivers’ or similar (it may be only listed as “Software & Updates” depending on your Ubuntu flavor). It looks like this:

add additional drivers via gui
This should be self-explanatory, so I will just leave this here.

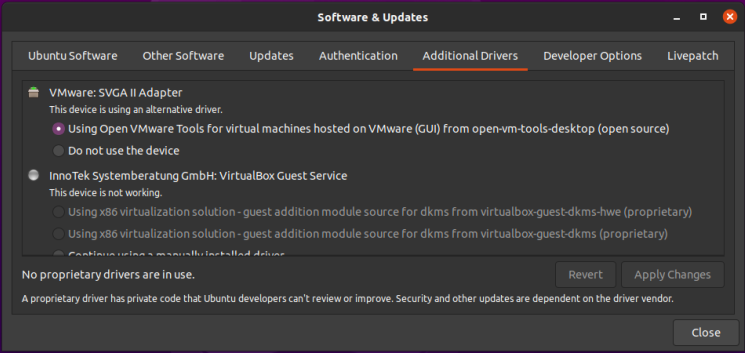
See? Pretty easy. Just pick what you want, apply the changes, and reboot.

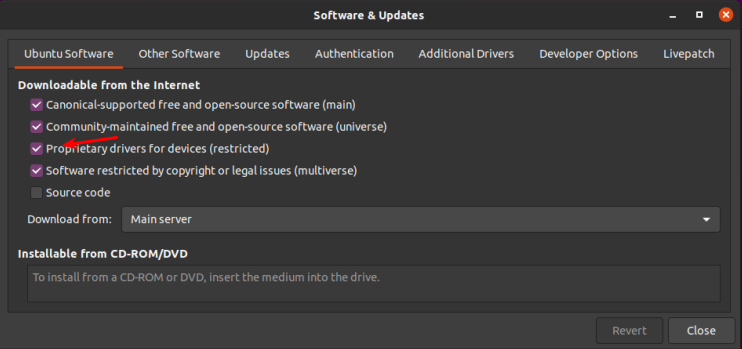
NOTE: You will need to have the ‘restricted’ repository enabled in order to do this. That should be assumed, but some of you may not know this. So, a quick screenshot should make this even easier to figure out – it’s in the same app as the above screenshot, but it’s in the first tab. It looks a little like this:

enable restricted repo
The arrow should make it clear. That repo needs to be enabled for this.

The second way is to use the terminal. Let’s go ahead and get the terminal opened by pressing CTRL + ALT + T on your keyboard.

Now, let’s check and see what drivers we can automatically install from the terminal:

The output should let you know what drivers are available for your devices. Again, this is pretty self-explanatory. You really don’t even need to enter that command, you can do it all automatically and get the recommended drivers automatically installed. It’s easy. Just run this:

That will go through and install the recommended drivers for your devices automatically. That will install the proprietary drivers, the ones with binary blobs and decidedly not opensource drivers. If those are the drivers you want, that’s the easiest way to install them.

Simply run the command, reboot, and you’re done. Not only are you done, you shouldn’t have to mess with them again – ever again. They will update automatically, they will automatically be applied when you update the kernel, and they will generally just work.

For the time being, we’re ignoring the idea of using the opensource drivers. I’ll simply say that I do quite well without needing proprietary drivers. I hardly ever bother installing them – unless I absolutely need a feature that’s not offered with the opensource drivers. I find that it’s still a working operating system and I can still easily meet my goals. You do you and you make the decision, but at least do it the right way after making that decision.

As always, thanks for reading. There’s a newsletter that will email you when a new article is published. That’s all it does. If you’re wanting to keep up with the site, that’s exactly how you do it! Well, there are push notifications available for those that prefer that. So, you do have choices! Either way, I won’t send you any spam. I promise!

Smash a Button
[Total: 0 Average: 0]
About Me: I'm just some retired dude with a little bit more free time on my hands. If you want to support the site, why not help yourself out too by ordering some inexpensive web hosting so that you can start your own site?


Manage Debian Repositories with a GUI

You can manage the repositories in Debian with the terminal just fine. It’s not very difficult, but you can also easily manage them with a GUI. Here’s how!

Debian is an operating system that is quite popular to build off. There are many derivatives and derivatives of derivatives. Debian first appeared on the scene in 1993 and is the parent of popular distros like Ubuntu – and so the grandparent of the many distros based on Ubuntu. I strongly suspect that more people use Debian derivatives than actually use Debian itself.

I’m going to assume that you have a brand new copy of Debian freshly installed. Furthermore, I’m going to assume that you only grabbed the first .iso of the lot. 

If the above is true, the first thing you’re going to need to do is get rid of the cdrom entries in your apt sources. If you try to install (or update) and have cdrom listed in your sources then you’ll bump into some errors. So, let’s deal with that first.

Start your terminal with the trusty CTRL + ALT + T.

Now, to fix that cdrom thing we’re going to need to edit your ‘sources.list’ file. To do that, we enter this in the terminal:

Find the line that starts with ‘cdrom’ and put a # in front of it to comment it out. It should look a bit like this:

commenting out the sources
That’s opened after editing. Your version may look different.

Now, go ahead and save it. Seeing as we’re using nano, you do that pressing CTRL + X, then Y, and then ENTER.

At this point, we need to make sure the system knows we made that change. So, we’re going to update the lists of software available with this:

That shouldn’t take all that long, especially if it’s a new installation and the software was updated during the install. So, our final steps in the terminal are these:

Pound on the enter key, type your password if asked, and pound on the enter key again after entering the ‘y’ response if asked.

That’s it. You’re done. If you look in your menu, you should see a new entry called “Software & Updates”. Root around in the tabs and revel in your new tool to manage repos and a few other things.

Software & Updates on Debian
See? Mission accomplished and it wasn’t even all that painful! Congratulations!

As always, thanks for reading. It’s truly appreciated. I check my stats most every day and have been enjoying seeing them trend upwards. The site is actually starting to get indexed and will hopefully be a repository of information for years to come.

Don’t forget to sign up for the newsletter. I’ll only send you automatic updates when there’s something published (or meta stuff concerning the site). I shan’t spam nor sell your email address. In fact, odds are good that I won’t even look at your email address, for I am a lazy and disinterested man. Have a great day!

Smash a Button
[Total: 1 Average: 5]
About Me: I'm just some retired dude with a little bit more free time on my hands. If you want to support the site, why not help yourself out too by ordering some inexpensive web hosting so that you can start your own site?


Is my Internal IP Address Static or Dynamic?

In the days of modern internet connections, you’re almost certainly using a router. Routers are different and may offer you a static or dynamic internal address for use on your LAN. This article will tell you how to tell the difference between a static and dynamic IP address using the Linux terminal emulator.

So, I’m going to assume you know what an IP address is. It’s basically the numbers used to indicate a specific computer, though it’s a bit more complicated and you can read the Wikipedia page on IP addresses if you want a more detailed explanation.

A dynamic IP address is an IP address that changes from time to time. A static IP address is one that doesn’t change. The first one will be different after a set amount of time or events, the second one will always be the same.

The benefits of a static IP address are many, chief among them is consistency. This is true even on a LAN (Local Area Network). If you don’t recall the device name, you can easily access it by IP address. If the device doesn’t have a hostname, you can access it by IP address, and the address doesn’t change.

The benefits of a dynamic IP address are pretty much none, unless you’re a provider who wants to rotate through them because of constantly changing devices. For you my delightful reader, in your realistic use-cases, there are no real benefits to having a dynamic IP address. They’re a great idea when you have more devices than you have IP addresses – which is very unlikely to be true if you’re reading this site for Linux tips! 

NOTE: Your Linux distro probably happily works with .local. So, if you have a dynamic address you can still access it through hostname.local. For example, this computer is ‘kgiii-desktop’ and I can access it with ‘kgiii-desktop.local’ easily enough.

Anyhow, it’s pretty easy to tell. The first thing you need to do is crack open your terminal. You can do this by pressing CTRL + ALT + T. Then, just enter:

Now, just look for ‘valid_lft’ and you’ll have your answer.

If it’s a dynamic IP address you’ll see something similar to this:

If it’s a static IP address, you’ll see something similar to this:

See? I told you that it was pretty easy! Now that you know, you can easily check and act accordingly. As always, thanks for reading. Don’t forget to sign up for the newsletter. You’ll get an email when a new article is published and make an old man happy!

Smash a Button
[Total: 1 Average: 4]
About Me: I'm just some retired dude with a little bit more free time on my hands. If you want to support the site, why not help yourself out too by ordering some inexpensive web hosting so that you can start your own site?


Fixing gdebi. The Ugly Hack!

One of my favorite software installation tools (when using Aptitude) is a little number known as gdebi. It makes installing applications with a .deb a very painless and rapid process. On top of that, you can later click on the original .deb and use gdebi to uninstall it. Best of all, it’ll resolve dependencies when that is a situation it can handle.

You don’t have to mess around with anything – just click and install. It’s lovely, small, and effective. It’s just like a Linux application should be!

This is how the manual describes gdebi:

gdebi lets you install local deb packages resolving and installing its dependencies. apt does the same, but only for remote (http, ftp) located packages. It can also resolve build-depends of debian/control files.

Note the lack of excessive adjectives. It was obviously not written by me. I have oft sung the praises of gdebi and am personally the motivation for hundreds of folks installing it. Seriously… I’ve told countless people to install gdebi! It’s just that awesome. I’ve probably been using gdebi since I first used a distro with the Aptitude package manager.

gdebi installing balena etcher
See? It’s so lovely and simple.

Imagine my dismay when I discovered gdebi was broken!

I’d open gdebi, click on install, gdebi would close without asking me for a password, crash, and not install the software. This is an ugly, ugly hack to fix it. It’s so very ugly – but it works.

Crack open your terminal with CTRL + ALT + T and enter the following:

Find this line:

And change it to:

Then save it. (CTRL + X, Y, and ENTER)

Now for the ugliness. This will fix the problem, but every time you use gdebi a terminal window will open up along with it. Fortunately, the terminal window will close itself after you’re done. It’s an ugly, ugly hack – but it does work when gdebi closes without installing the application.

As always, thanks for reading. Leave a comment below or look to your right where you can sign up to get notifications when new articles are published. If you’re feeling energetic, go ahead and register so that you can write an article or two yourself! If you want to write an article without registering, you can do that too – just click here!

Smash a Button
[Total: 0 Average: 0]
About Me: I'm just some retired dude with a little bit more free time on my hands. If you want to support the site, why not help yourself out too by ordering some inexpensive web hosting so that you can start your own site?


Linux Tips
Creative Commons License
This work is licensed under a Creative Commons Attribution 4.0 International License.
SITEMAP