“Best” ‘inxi’ Command?

If you don’t know about inxi, you’re either really new to Linux or you’ve been living under a rock. It’s a tool to give you information about your computer. So, what is inxi? This is what ‘man inxi’ has to say:

inxi is a command line system information script built for for console and IRC. It is
also used for forum technical support, as a debugging tool, to quickly ascertain user
system configuration and hardware. inxi shows system hardware, CPU, drivers, Xorg,
Desktop, Kernel, GCC version(s), Processes, RAM usage, and a wide variety of other
useful information.

It’s actually fairly complicated and has a ton of options. So, what’s the best? 

Personally, I have ‘inxi’ aliased to be ‘inxi -v 5’. It gives me a great deal of information and generally has all the information I’d be looking for.

Here’s an example output from one of my older computers that I’m running VMs on:

[code]kgiii@kgiii-lmde:~$ inxi -Fxxxz
System: Kernel: 5.4.0-56-generic x86_64 bits: 64 compiler: gcc v: 9.3.0 Console: tty 1
dm: LightDM 1.30.0 Distro: Linux Mint 20 Ulyana base: Ubuntu 20.04 focal
Machine: Type: Desktop System: Dell product: OptiPlex 3010 v: 01 serial: <filter> Chassis:
type: 15 serial: <filter>
Mobo: Dell model: 0T10XW v: A01 serial: <filter> BIOS: Dell v: A22
date: 11/29/2018
CPU: Topology: Quad Core model: Intel Core i5-3570 bits: 64 type: MCP arch: Ivy Bridge
rev: 9 L2 cache: 6144 KiB
flags: avx lm nx pae sse sse2 sse3 sse4_1 sse4_2 ssse3 vmx bogomips: 27138
Speed: 1596 MHz min/max: 1600/3800 MHz Core speeds (MHz): 1: 1597 2: 1596 3: 1597
4: 1597
Graphics: Device-1: Intel Xeon E3-1200 v2/3rd Gen Core processor Graphics vendor: Dell
driver: i915 v: kernel bus ID: 00:02.0 chip ID: 8086:0152
Display: server: X.org 1.20.8 driver: modesetting unloaded: fbdev,vesa tty: 96×36
Message: Advanced graphics data unavailable in console. Try -G –display
Audio: Device-1: Intel 6 Series/C200 Series Family High Definition Audio vendor: Dell
driver: snd_hda_intel v: kernel bus ID: 00:1b.0 chip ID: 8086:1c20
Sound Server: ALSA v: k5.4.0-56-generic
Network: Device-1: Realtek RTL8111/8168/8411 PCI Express Gigabit Ethernet vendor: Dell
driver: r8169 v: kernel port: e000 bus ID: 02:00.0 chip ID: 10ec:8168
IF: enp2s0 state: up speed: 100 Mbps duplex: full mac: <filter>
IF-ID-1: vmnet1 state: unknown speed: N/A duplex: N/A mac: <filter>
IF-ID-2: vmnet8 state: unknown speed: N/A duplex: N/A mac: <filter>
Drives: Local Storage: total: 476.94 GiB used: 111.16 GiB (23.3%)
ID-1: /dev/sda vendor: Team model: T253X2512G size: 476.94 GiB speed: 3.0 Gb/s
serial: <filter> rev: 7B0 scheme: MBR
Partition: ID-1: / size: 467.96 GiB used: 111.16 GiB (23.8%) fs: ext4 dev: /dev/sda5
Sensors: System Temperatures: cpu: 29.0 C mobo: N/A
Fan Speeds (RPM): N/A
Info: Processes: 246 Uptime: 2d 57m Memory: 15.54 GiB used: 1.98 GiB (12.7%)
Init: systemd v: 245 runlevel: 5 Compilers: gcc: 9.3.0 alt: 9 Shell: bash
v: 5.0.17 running in: tty 1 (SSH) inxi: 3.0.38[/code]

As you can see, that’s a lot of information and that’s exactly the information I (and others) need to know to help you in many situations. So, when I ask for your inxi output, that’s exactly what I want to see.


Realtek RTL8192EU and Linux: It works!

Probably because I was scouring AskUbuntu and reading a number of complaints about getting their wireless device working, I decided to see exactly how difficult it was.

I have a computer that I use for testing and I mostly access it by VNC. It has an unused wireless dongle and I figured now was a good time to see if I can make it work. 

The first step was to turn it on. Believe it or not, it worked. It had a very, very weak signal even though it’s within a few feet of the router. So, I cracked open my terminal and entered:

inxi -Fc 0

Sure enough, I found this:

Device-2: Realtek RTL8192EU 802.11b/g/n WLAN Adapter type: USB

So, I turned to a search engine and entered:

Realtek RTL8192EU +Linux driver

I scanned the results and noticed that there was fairly recent (mid-2018) GitHub page here. So, I headed there to read what the author had to say.

Rather than playing around, I made sure I’d followed their directions:

sudo apt -y install linux-headers-generic build-essential dkms git

Except that’s not necessarily going to work, so I simply removed the -y.

sudo apt install linux-headers-generic build-essential dkms git

There. That’ll work. I mashed the enter button, entered my password, and I downloaded the .zip file from the top of the page while it installed. I didn’t really see any need to build it myself, nor did I want the git hurdles (even though I’d just installed it). So, I just downloaded it to /Downloads and then extracted it into its own folder.

Once that was all done, I entered the newly created directory and ran:

sudo ./install_wifi.sh

The sudo elevates my permission, the ./ tells it that I want the file in the directory I’m in, and the install_wifi.sh is the name of the script that will install the drivers automatically. It will take a few minutes, even on modern hardware, but it’s not a difficult task. If anything, it’s straightforward and intuitive.

I followed that up with a reboot and, sure enough, I was then able to use the driver and my signal strength was significantly higher. That’t it. That’s all it took. Does it seem hard? Probably. Once you’ve done it a few times, you’ll be used to it. Working in the terminal is one of the greatest things you can do with Linux. There’s no reason to be afraid of it. Just know what the commands are going to do before you go ahead and do them.


Installing NetSurf Browser on Ubuntu 18.04

The NetSurf Browser looked interesting to me. I was using a virtual machine with ArchBang Linux and I’m a sucker for a different browser. I have at least two dozen browsers installed at any one time, even though I regularly only use a few. Anyhow, ArchBang has a default of NetSurf and that piqued my interest.

NetSurf doesn’t do anything special. It’s just a light browser that claims to have CSS support. When I tried browsing with it, it was quite painful and it displayed sites rather poorly. Still, if you have a very old computer and want to have a browser, this may be the kind of browser you’re stuck with. It is technically a browser that’s lightweight and seems to have some basic CSS support.

As I said, I’m a sucker for browsers and have a bunch installed. In this case, I downloaded the source code and decided I didn’t really feel like building it. So, I did the ol’ ‘apt-cache search netsurf’ and nothing popped up. So, I went online and looked for a .deb that’d make it easy to install. It turns out to be more of a pain in the butt than you might think.

No matter… I’ve got you covered. Like normal, crack open  your terminal with CTRL + ALT + T. Then, enter the following:

[code]
cd Downloads
mkdir netsurf
cd netsurf
wget http://archive.ubuntu.com/ubuntu/pool/universe/n/netsurf/netsurf-common_3.6-3.2_all.deb
wget http://archive.ubuntu.com/ubuntu/pool/universe/n/netsurf/netsurf-gtk_3.6-3.2_amd64.deb
wget http://archive.ubuntu.com/ubuntu/pool/universe/n/netsurf/netsurf_3.6-3.2_all.deb
sudo apt install ./netsurf-common_3.6-3.2_all.deb
sudo apt install ./netsurf-gtk_3.6-3.2_amd64.deb
sudo apt install ./netsurf_3.6-3.2_all.deb
[/code]

Then, assuming all goes well, you’ll have a working NetSurf in your menu, under Internet if you use an Ubuntu flavor that uses menus like that. 

As 18.04 is the last official 32 bit Ubuntu, and official flavors, odds are good that many people will be looking for a lightweight browser to go with it. This isn’t a very good browser – but it’s a working browser, and a browser that doesn’t take a lot of resources to run. Don’t expect too much from it and you won’t be too let down.

You’re probably better off taking the performance hit and running Vivaldi


How To: See Installed Applications

Here’s a nice and quick way to see what software you have installed – assuming you’re using a distro with Aptitude.

Crack open your terminal. You can use CTRL + ALT + T. Enter this:

[code]dpkg -l[/code]

That doesn’t do you a whole lot of good, but it works. So, let’s make it more usable.

[code]dpkg -l > Documents/installed_apps.txt[/code]

Now, open your Documents directory and you’ll have a handy list of your installed apps in a file with an intuitive name.


Minimize Pidgin to Tray

I’d been trying to figure out how to minimize Pidgin to the tray and finally figured it out. It turns out, it’s easier than I’d expected.

Lately, I’ve been lurking a few of the Lubuntu IRC channels. This means leaving a chat client open and I figured I might as well use the default and Pidgin used to be pretty good back when I still regularly used IRC. Seriously, IRC has been around for a long, long time – eons in Internet time.

It also turns out I should have used a search engine. That would have saved so much time.

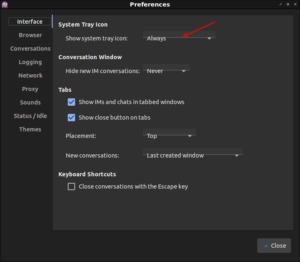
Open Pidgin, click on Tools, click on Preferences, and set it to always show the system tray icon. That’s all it takes.

pidgin settings
Set Pidgin to minimize to tray.

And that’s all it takes.