Let’s Play With ‘apt-cache’ Some More!

People use apt, and apt-get, all the time. We use it for the most basic things. We use apt to install, remove, and purge software. However, there’s apt-cache and it’s pretty handy.

A couple of days ago, I published an article about using apt-cache to find the official project homepages of your installed software. Today, I’m going to quickly cover some of the other things you can do with apt-cache. Obviously, if you don’t have apt and apt-cache then this article will do you exactly no good.

So, where to begin? Let’s just assume you’ve already installed inxi and you know how to open the terminal by pressing CTRL + ALT + T on your keyboard.

Done? Good, let’s get started!

First, if you want to display a bunch of generic information, you can use the following:

That will show you a bunch of information about a package. You don’t even have to have it installed. For this one, you will have to have the complete package name for it to be successful. In the next command, that’s not really required.

For example, you could type in ‘inx’ and it will find inxi, among other things. You can use that command with the ‘–full’ switch, and get a ton of information, like so:

Anyhow, you don’t even have to use an application name with the search. You can search for keywords and find applications that way. If you wanted to see what text editors you might have available (you’ll need to weed through them carefully) then you’d use this command:

Go ahead and give it a try. You might be surprised at the vast number of results you’ll get with that command. Seriously, it’s a lot of results. There’s probably some text editors you’ve never heard of before hidden among those results!

Next on the list is checking the policy. This way you can see what version is installed, what version is available, and you can even see what repository was the source for the application. It’s just as easy as the rest.

Among this giant, perhaps overwhelming, source of data are a couple of other neat things you can do. You can easily see both the dependencies and the reverse dependencies.

For clarity sake, the dependencies are the extra software that needs to be installed for the package in question to function. The reverse dependencies are what packages require the installation of the package in question in order to be fully functional.

To find the dependencies:

And the reverse dependencies:

And, there you have it. Those are the most common ways you’re going to use apt-cache. There are other ways and there is more information available, but those are pretty much all the ways you can expect to use it in the normal course of activities. If you want to know more, you can always check the man page. To do that, it’s just:

And, there’s one bonus round! There’s pretty much no good reason to run this, other than curiosity, but you can actually get some pretty cool stats about how many packages are available, how many are real packages, how many are virtual packages, and things like that. It’s a pretty simple command.

See? Another lovely way to use the terminal to gather information. I use the terminal nearly exclusively to manage my installed software.
Smash a Button
[Total: 0 Average: 0]
About Me: I'm just some retired dude with a little bit more free time on my hands. If you want to support the site, why not help yourself out too by ordering some inexpensive web hosting so that you can start your own site?


How To: Use ‘apt-cache’ to Find Homepage for Your Installed Apps

It can come in pretty handy to know for certain the homepage for the applications you have installed. You can do this with ‘apt-cache’. I’ll show you how. This is a pretty easy article to follow and just another tool to add to your toolbox.

NOTE: This is only valid for systems that use apt. As the title indicates, it requires ‘apt-cache’. Without apt-cache, this page will do you no good. None good. That’s how much it will do you. None!

Why would you want to know the homepage – and, more so, the preferred homepage? For starters, in the days of GitHub and everyone forking, and awkward application names that aren’t easily searched for, it’s hard to know which site is the correct one.

Maybe you want to report a bug? Maybe you want to request a feature? Maybe you want to make a donation? Maybe you just want to thank the author for writing such awesome software? Maybe you want to know where the homepage is because you need support and you’re not sure where to turn to?

There are all sorts of reasons why you might want to know the homepage of a piece of software. It’s actually something that’s important. It’s also something your system already knows and will happily show you if you know the proper magical incantation. 

Like many other articles, you’re gonna want the terminal for this. Let’s go ahead and get that opened by using your keyboard and pressing CTRL + ALT + T. 

Got your terminal emulator open? Good! Let’s start with the command.

If you do not have ‘inxi’ installed, feel free to use a different application. Note that you do not need to use sudo for this. Not all apt commands require sudo. You only need sudo when you’re actually doing administrative tasks. See? I saved you some typing!

Anyhow, in the text output from the above command you’ll see a line that starts with “Homepage:”. If you hadn’t already guessed it, that’s the line that tells you the authors homepage. This, of course, only works on installed applications. For sanity and space sake, it’s not like your system has all that information downloaded for all the possible packages. Thus, it works on naught but the apps you have already installed.

So, let’s go ahead and make the command a little more precise. We’ll pipe the output through grep and get rid of the cruft we don’t actually need. In that same terminal, go ahead and enter:

NOTE: The command contains a capitalized letter H because Linux is often case-sensitive and is certainly case-sensitive in this case. If you don’t believe me, try it with a lowercase h!

But wait, there’s more!

Not only is there homepage information in there, there’s sometimes some useful nuggets of information in there. If you have LibreOffice installed, go ahead and check (skip the pipe and grepping) to see what the output is. Inside, it has a ton of additional information, including listing ways that you can extend LibreOffice by installing more software.

And there you have it. You can now easily find the homepage for the applications you have installed. Should you need to contact the author, check for information, or just see if they did anything else, you now know how to do that. It’s a little hidden nugget that most folks don’t seem to know. Well, now they do…

Yay! You made it all the way to the bottom. You deserve a treat. Seeing as you’ve already got the terminal open, and seeing as we’re dealing with apt-cache, let’s just get some pretty neat stats with:

That’s it and thanks for reading. I appreciate the audience and am happy that I finally am putting some effort into this project. I’ve been meaning to do this for years, but something always got in the way. If you want to get notified when new articles are posted, just scroll up and sign up for the newsletter. I promise not to send you any commercial emails and I won’t give any of your private data away.

Smash a Button
[Total: 1 Average: 5]
About Me: I'm just some retired dude with a little bit more free time on my hands. If you want to support the site, why not help yourself out too by ordering some inexpensive web hosting so that you can start your own site?


Let’s Spin up a Quick Python Server!

Today we’re going to use a basic Python server to share files between multiple computers both quickly and easily, by using tools you likely have by default.

First, let’s set the stage…

You’re eight beers deep while sitting on your couch and playing with virtual machines. You have already downloaded the latest and greatest distro – but it’s way over on your desktop and you’re both lazy and not too sure about your walking ability!

What to do? What to do?

Sure, you could just download the file all over again – but you’re aware of how much the project pays for bandwidth and you’re inebriated enough so that if you don’t do it right now then it just might not get done! So, you need that file and you need it with a quickness!

I’m going to make a huge assumption here. Someday, I’ll write an article explaining how, but for now we’re going to assume that you have SSH (secure shell) enabled on your desktop (in this scenario) and that you know how to use it. So, it’s with a giant assumption and a leap of faith when I say that you’ve successfully used SSH to get to your desktop and you’ve already navigated to the directory where this latest and greatest distro image resides.

NOTE: If you don’t have SSH enabled, surely you have access to a search engine. Go figure it out! Eventually I’ll write an article about it, but there are already hundreds of tutorials already out there.

Anyhow, sure… You’ve used SSH and now you could transfer the file with SCP (secure copy protocol) if you wanted. That’s all well and good, but darn it we’re aiming for the most contrived situation possible just so I can tell you how to spin up a server with Python! So, for whatever reason, you’re hellbent on doing this in your browser. And do this in your browser you shall!

Yeah, there are a ton of ways to transfer files – many (perhaps all) of them better than this! Though you could also use this for testing your HTML and CSS skills. So, there’s that! By the way, if my contrived scenario isn’t good enough for you, you can make up your own reasons to do this. If your ideas are any good, you can even contribute to the site!

Anyhow, you’re now connected to that desktop with SSH and you’re in the directory where you store those important files. Now that you’re there, run the following command:

If you’re using Python 1x or 2.x you should probably update, but the magic server command is this:

If you’re using Python 3.x then the command will be:

For the record, the ‘-m’ is telling Python which module to load. Either way, you can now open your browser and enter this tidbit in the address bar:

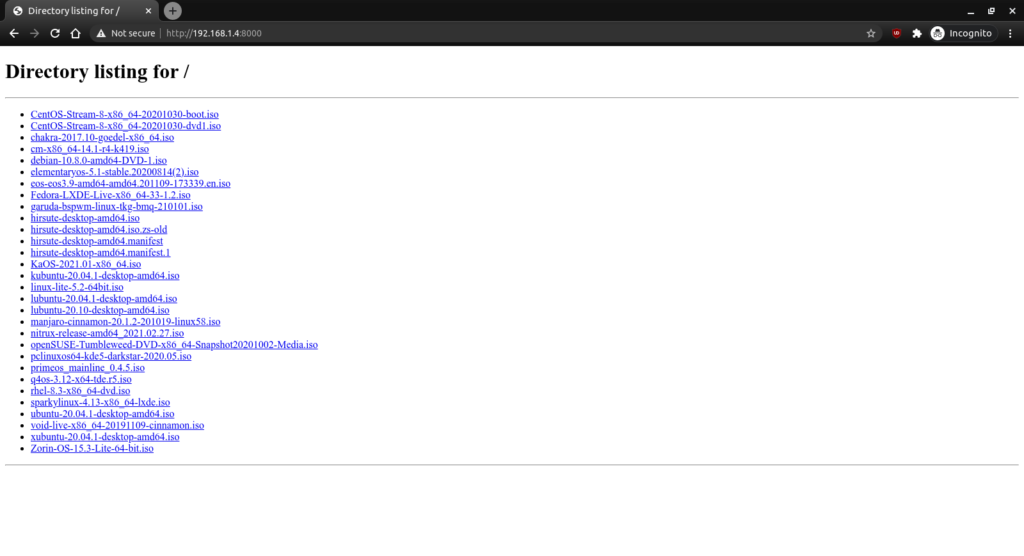
Obviously you should adjust it accordingly. If you’ve done it right, it should look similar to this:

You're effectively running a simple server.
Obviously it will not look the same for you. It’ll have your files!

If you want, you can also connect via the hostname. In the above example, the computer I was connected to is known as ‘kgiii-lmde’ and you need only add the .local for this to work. See the image below:

See? No IP address required! You can also use this for the above mentioned SSH!

Now, if you want to do so, you can also change the port number. This is the same for both commands. In both cases, just add your chosen port number at the end. Like so:

And, again, it should look a bit like this:

Note the changed port number. You should probably avoid reserved ports.

Anyhow, you can use this for all sorts of things. You can now navigate the user’s files with a web browser. If you’re really insane, you can make this available over the internet by enabling port forwarding – but I’m gonna suggest you not do that. If you’re going to do that, you should probably use something more robust and with much finer permission controls. It’d also take quite a bit of work to turn this into a server that’d do anything more than offer up static files. I suspect (but don’t know) that it’s about as secure as a screen door, so putting this on the public web would just be silly. Don’t do that.

Though my written use-case was very contrived, I find myself using this easy server fairly regularly. I actually prefer to use FTP to move files between computers, but I’ll spin up a quick Python server so that I can grab things like config files and whatnot. Believe it or not, even wget works. In this instance, if I wanted to grab that Debian ISO, I could just do this:

So long as the server is up and running, wget works. Granted, there’s not too many contrived situations where I’d need to use wget on top of all this – but it’s fun to play with and educational.

What sort of uses can you come up with? Feel free to leave them as comments below. Who knows? Maybe they’ll end up being motivations for future articles?

As always, thanks for reading. Don’t forget to sign up for the newsletter. Chances are good that I’ll not always be on the forums and this is a way for you to keep track of what gets published. I also won’t send you any spam, nor will I trade/sell/give your email address to anyone.

Smash a Button
[Total: 2 Average: 5]
About Me: I'm just some retired dude with a little bit more free time on my hands. If you want to support the site, why not help yourself out too by ordering some inexpensive web hosting so that you can start your own site?


Manage Debian Repositories with a GUI

You can manage the repositories in Debian with the terminal just fine. It’s not very difficult, but you can also easily manage them with a GUI. Here’s how!

Debian is an operating system that is quite popular to build off. There are many derivatives and derivatives of derivatives. Debian first appeared on the scene in 1993 and is the parent of popular distros like Ubuntu – and so the grandparent of the many distros based on Ubuntu. I strongly suspect that more people use Debian derivatives than actually use Debian itself.

I’m going to assume that you have a brand new copy of Debian freshly installed. Furthermore, I’m going to assume that you only grabbed the first .iso of the lot. 

If the above is true, the first thing you’re going to need to do is get rid of the cdrom entries in your apt sources. If you try to install (or update) and have cdrom listed in your sources then you’ll bump into some errors. So, let’s deal with that first.

Start your terminal with the trusty CTRL + ALT + T.

Now, to fix that cdrom thing we’re going to need to edit your ‘sources.list’ file. To do that, we enter this in the terminal:

Find the line that starts with ‘cdrom’ and put a # in front of it to comment it out. It should look a bit like this:

That’s opened after editing. Your version may look different.

Now, go ahead and save it. Seeing as we’re using nano, you do that pressing CTRL + X, then Y, and then ENTER.

At this point, we need to make sure the system knows we made that change. So, we’re going to update the lists of software available with this:

That shouldn’t take all that long, especially if it’s a new installation and the software was updated during the install. So, our final steps in the terminal are these:

Pound on the enter key, type your password if asked, and pound on the enter key again after entering the ‘y’ response if asked.

That’s it. You’re done. If you look in your menu, you should see a new entry called “Software & Updates”. Root around in the tabs and revel in your new tool to manage repos and a few other things.

See? Mission accomplished and it wasn’t even all that painful! Congratulations!

As always, thanks for reading. It’s truly appreciated. I check my stats most every day and have been enjoying seeing them trend upwards. The site is actually starting to get indexed and will hopefully be a repository of information for years to come.

Don’t forget to sign up for the newsletter. I’ll only send you automatic updates when there’s something published (or meta stuff concerning the site). I shan’t spam nor sell your email address. In fact, odds are good that I won’t even look at your email address, for I am a lazy and disinterested man. Have a great day!

Smash a Button
[Total: 1 Average: 5]
About Me: I'm just some retired dude with a little bit more free time on my hands. If you want to support the site, why not help yourself out too by ordering some inexpensive web hosting so that you can start your own site?


Let’s Count the Installed Packages!

Have you ever wanted to know how many packages you’ve installed? It’s actually a really simple process. I’ll show you!

This is only useful if your distro uses ‘dpkg’, which is actually quite a few distros. If you remember correctly, I’ve previously told you how to use ‘dpkg’ to get a list of installed applications. It was a pretty simple command.

Well, so isn’t this a simple command.

Like pretty much every time, let’s get that terminal opened up. (CTRL + ALT + T)

Now, if you’d followed the above link’s directions, you’d have a file called ‘installed_apps.txt’ and it would be in your Documents directory. If you open that file, you’ll see that not all the lines are actually installed applications. There are some lines that contain data that isn’t an installed application.

But, if you look carefully, you’ll see that the lines with the applications all begin with ‘ii’. We can use that to make our work more accurate.

Now, you could try this:

If you’re curious, ‘cat‘ stands for concatenate. It has been around since pretty much Unix v. 1. It basically reads a file and spits out the content. The man page describes it as thus:

cat – concatenate files and print on the standard output

See? Pretty simple.

Next, you’re telling it which file to work on (installed_apps.txt in the Documents directory). Then you’re telling it to look for the letters ‘ii’ and to count the lines that contain them. 

Note: In some cases, this will not be 100% accurate. If you have something installed with ‘ii’ in the name then it will count that as well. However, the goal here isn’t actually 100% accuracy, the goal here is to help you get familiar with some of these terminal commands.

So, what if you haven’t followed along and don’t actually have that file? Can you still do this? Absolutely! Watch this:

To be a bit more clear, that little ‘|’ character is called a pipe. You’ll see it fairly often. It’s used to take the commands from one command and use them in another. It goes back to the philosophy of ‘hiding the internals’, with the goal being simplicity and clarity. But, you never have to make the text file to perform this counting exercise.

Again, this command will give you an inaccurate result if you happen to have an application that has an ‘ii’ in the name. That’s fine. This is great for estimation and you really don’t need a hard number for anything. In a quick look, I have exactly zero apps with ‘ii’ in the name. So, in my case the count should be spot on. The goal is to help you get more comfortable in the terminal and get used to some of these commands. They’re surprisingly useful, even in day-to-day operations.

Like always, thanks for reading. If you want, you can sign up for the email newsletter. It’s over there, in the right sidebar. I promise, I won’t send you any spam, I won’t sell your email address, I won’t give your email address away, and I won’t send you pics of my dinner. So, sign up and be the first person on the block to read new articles!


Smash a Button
[Total: 0 Average: 0]
About Me: I'm just some retired dude with a little bit more free time on my hands. If you want to support the site, why not help yourself out too by ordering some inexpensive web hosting so that you can start your own site?


Linux Tips

This work is licensed under a Creative Commons Attribution 4.0 International License.
SITEMAP
Exit mobile version