How To: Enable a Swapfile

Yeah, yeah… I have a modern, large SSD. I have more RAM than I’ll ever possibly use. I still want/enable swap, in this case a swapfile. Imagine my dismay when I installed Lubuntu 20.04 and found there’s no swap available during the basic installation? (It’s there in 21.04.)
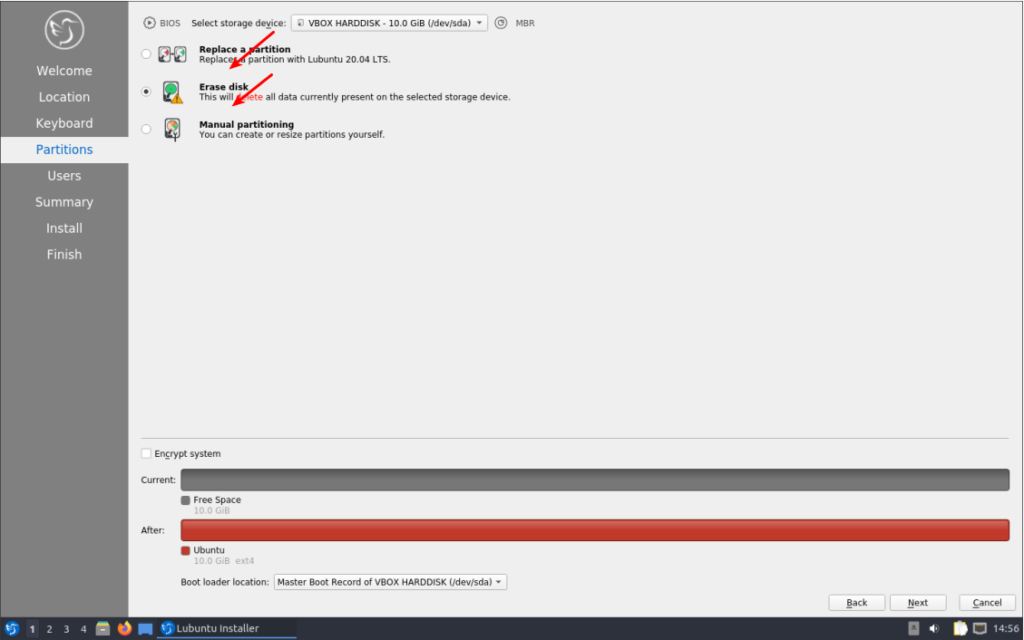
no swapfile
See? There’s nothing there!

Sure, I could have made a swap partition during the installation, but that didn’t seem like something I wanted to do – besides, I can always add it later. Which, of course, I did.

There are all sorts of views about whether swap is required in my situation, or in any situation, but I’m of the mind that disk space is cheap and my computer is faster than I am. So, if it has any chance of helping, it’s all good. It should also be mentioned that swap is far more complicated than ‘a place where the kernel sticks stuff when there’s no more RAM left’. In fact, it’s a lot more complicated than that. It’s where the kernel pages content that’s seldom used, and it’ll happily use swap even when there’s plenty of RAM available.

Since it’s lacking, let’s learn how to add a swapfile to Ubuntu (and official flavors) 20.04 and presumably other similarly aged variants. It’s a pretty painless process. 

Like normal, let’s crack open your terminal emulator with CTRL + ALT + T.

Now, let’s check to see if you’ve already got some swap going on.

If it shows nothing but a new line, you have no swap. If it says anything else, you’ve got swap enabled already and probably don’t need this article.

Just so you know, I personally just did this a couple of days ago, after upgrading to Lubuntu 20.04. So, I’m pulling this data from .bash_history.

Let’s make a swapfile.

Why 8 gigabytes when I have ample RAM and an SSD? Because I never, ever want to worry about it again. I want to be able to open up every app I have and leave them open for a month. You do you and decide how big you want it to be!

Now, we need to set some permissions. We don’t want anyone writing to swap, we only want root writing to swap.

Next, we need to let the OS know that’s swap space.

And turn it on with:

And you now have swap in the form of a swapfile and it’s turned on. I suppose we should make this permanent. To do this, we need to edit fstab and nano is a good tool for this.

And add this at the bottom of that document:

Those are the 0 digit, in case the font here makes it confusing. (I think I’ll try messing with the fonts.)

Either way, you should now have a swapfile that gets loaded on reboot and is currently loaded and working. You can next edit the swappiness value. In Ubuntu, it is a default of 60. If you want to edit it, you’ll have to wait for another article.

Like always, thanks for reading. It’s missing at the moment, or not working, or I’d say subscribe and get notifications of new articles. However, I’ll have to work on that. I just haven’t made the time to do so.
Smash a Button
[Total: 0 Average: 0]
About Me: I'm just some retired dude with a little bit more free time on my hands. If you want to support the site, why not help yourself out too by ordering some inexpensive web hosting so that you can start your own site?


How To: Install ‘gedit’ With All The Bells and Whistles

There are many text editors out there, but gedit is a perennial favorite. There are also many plugins to extend gedit, and this is an easy way to install a bunch at once.

gedit, the default editor for the Gnome desktop environment, is a part of the GNOME Core Applications and is available in pretty much every distro. It also doesn’t actually need a lot of additional dependencies, which helps make it useful for most any popular desktop environment.

You can use gedit for anything, from programming to writing markup for your website. You can use it as a plain text editor and there are many ways to extend it, to add functionality not included by default. There are plugins to highlight syntax, to auto-complete words, to auto-close brackets, etc. You can make it do all sorts of things you’d not expect from a plain text editor.

Given that disk space is absurdly cheap these days, I don’t see any reason to not just go ahead and install as many plugins at once as I can. I may not use them all, but I’ll use most of them and I can just not enable those that I don’t want to use. So, how to install it all at once?

Crack open your terminal with CTRL + ALT + T and enter the following:

So, what’s going on there? You can string together applications with aptitude and this is installing gedit first, a pack of common plugins, and then every other plugin that uses the ‘gedit-plugin-*’ format and is in the repositories.

If you don’t already know, the asterisk is known as a wildcard. A wildcard basically means, “any character.” So, foo* is anything from fool to foolish and foob* is anything from foobar to foob-gibberish183742 or whatever. It’s unlike the question mark, which only matches one character, in that it means any and all characters.

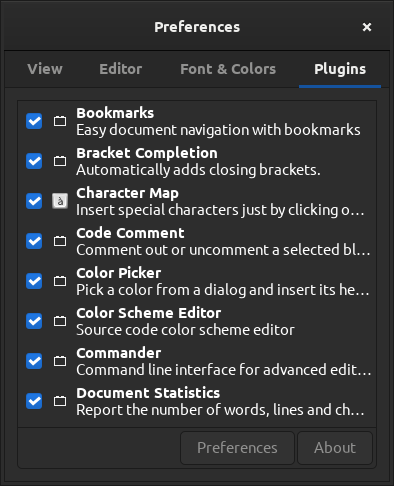
It should be noted that this only installs the plugins. You still can’t use them until you enable them. To select them, you need to first open ‘gedit’ (which will almost certainly be called “Text Editor” in your application menu) and click on preferences where you can navigate to the right-most tab and enable them. It looks like this:

gedit preferences
Select plugins ’til you’re satisfied!

If you did this properly,  you should now have a bunch of plugins enabled and not have to hunt them down, one by one, trying to find and install them manually. Is this a bit of overkill? Perhaps, but disk space is cheap and the entire thing takes up less than 19 additional MB on my system.

Like always, thanks for reading. Scroll up and look right. Toss your name and email address in there and you’ll get notified of new articles. I promise, I won’t spam you. You ain’t even gotta use your real name!

Smash a Button
[Total: 1 Average: 5]
About Me: I'm just some retired dude with a little bit more free time on my hands. If you want to support the site, why not help yourself out too by ordering some inexpensive web hosting so that you can start your own site?


Change the sort-order in Lubuntu Quick Launch

Lubuntu has gone from LXDE to LXQt. In LXQt there’s no way to drag the icons in the quick launch to sort them to your liking. Fear not, you can still sort them.

This one is actually pretty easy, you just have to know where to look.

Edit: Press and hold CTRL and then you can drag and drop them…

Navigate to ~/.config/lxqt/ and open ‘panel.conf’ with your favorite text editor. Scroll down until you see:

[quicklaunch]

You’ll then see your quick-launch applications on their own line and they’ll have a numeric value. That numeric value is how you sort them. 

For example, mine looks like this:

In the ‘apps\1\desktop’ there is a 1. That translates to the furthest right icon in the quick launch area of the taskbar. If I wanted it to be on the furthest left, I’d change the 1 to a 6 and then change something else to be 1. It’s pretty straightforward. I was pleasantly surprised when I was able to find that section. Why we can’t just drag them around like we could on LXDE is another matter entirely.

As always, scroll on up and subscribe to get notifications when I publish something new. Or not… It’s up to you! Who the heck am I to be shouting out orders anyhow?!?

Smash a Button
[Total: 0 Average: 0]
About Me: I'm just some retired dude with a little bit more free time on my hands. If you want to support the site, why not help yourself out too by ordering some inexpensive web hosting so that you can start your own site?


How To: Check Your Logs For Errors

When you notice a problem with your Linux box, you’re possibly only noticing the symptoms and not actually seeing the reason. The reasons are often made clear in your error logs. This is how to read them.

Back in the early 1900s (when horses, trains, and your feet were the primary mode of travel), it required the terminal to really deal with your error logs. You’d ask for help on a forum and they’d want you to run something like:

It worked and it worked well, especially if you knew what you were looking for. If you weren’t, then you’d be scrolling through tons of text in the terminal with few visual cues or no easy way to sort through the data.

Well, enter KSystemLog. KSystemLog’s man page describes it as thus:

Description: system log viewer
KSystemLog show all logs of your system, grouped by General (Default system
log, Authentication, Kernel, X.org…), and optional Services (Apache, Cups,
etc, …). It includes many features to read nicely your log files:
* Colorize log lines depending on their severities
* Tabbed view to allow displaying several logs at the same time
* Auto display new lines logged
* Detailed information for each log lines

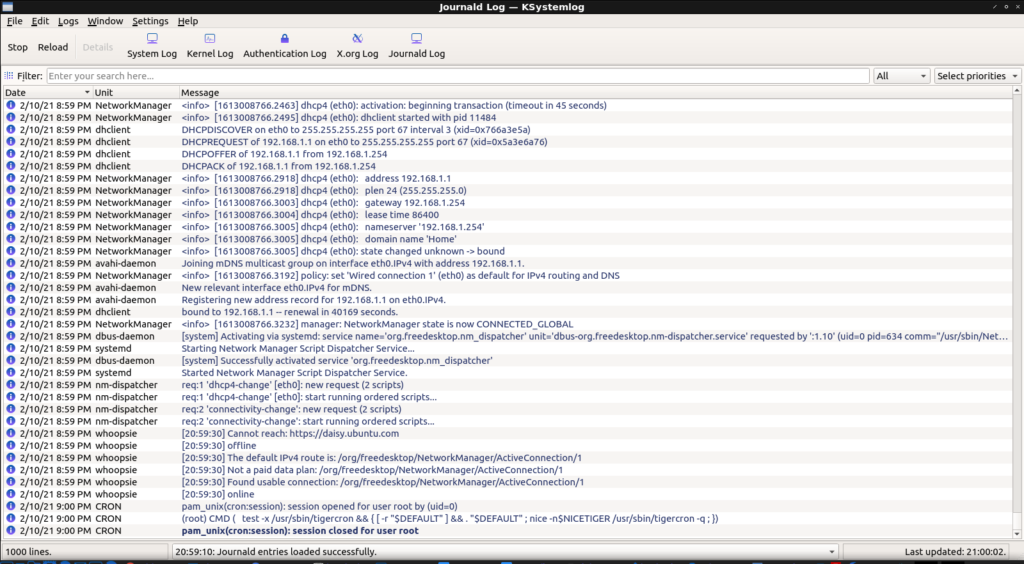
And it looks like this:

ksystemlog
KSystemlog UI – not pictured, fancy colors

As you can see from the image, this is a handy GUI method to view your various system logs. If you look at the image above, you’ll see that one of the lines is a darker blue than the previous lines. This is because it was a new log entry, an event that happened after I’d opened the application.

So, in other words, you can open KSystemLog and then open an application that’s giving you trouble and see what errors are thrown. You can also examine the entire list of errors and events. 

Not only that, but the events in the logs are color-coded. This provides easy visual cues as the events range in color from a light gray (normal) to a bright red for emergency-level events. You can also apply filters and search for specific events.

error messages in kystemlog
Note the color change for errors.

KSystemLog is a KDE application but pulls in very few dependencies. It loads rapidly and will pick up all installed log files by default. In my case, it finds these:

ksystemlog logs available
Currently available logs on this particular system.

Chances are pretty good that it is in your default repositories. If you’re using a Debian derivative then you can install it by opening the terminal and entering:

Anyhow, there you have it. Adjust the above command for your distro’s package manager (or go dig it out if you’re manually installing packages). You can take the information from the logged errors and use them as search terms to help.

It’s absolutely amazing how many errors can be resolved by just taking the exact error message and tossing it verbatim into a search engine of your choice. I’ve used this method to troubleshoot so many times that I think it’s an asset we should all have in our toolbox.

As always, go ahead and subscribe to get notifications when new articles are published. If you want, you can go ahead and register and start helping. If you don’t want to maintain your own site and want to write articles, that can be arranged. Thanks for reading!

Smash a Button
[Total: 0 Average: 0]
About Me: I'm just some retired dude with a little bit more free time on my hands. If you want to support the site, why not help yourself out too by ordering some inexpensive web hosting so that you can start your own site?


Ubuntu Restricted Extras

As I trawl the ‘net, I see some confusion about the Ubuntu Restricted Extras package. This post is meant to clear up any confusion. Given the nature of the beast, I assume this is also valid for Ubuntu derivatives – but I’ve not explored all of them personally (and there are many).

So, what’s in the package? It’s a package with more than one thing in it and will also download (if allowed) more data along the way. This is what’s inside:

gstreamer0.10-ffmpeg
gstreamer0.10-fluendo-mp3
gstreamer0.10-pitfdll
gstreamer0.10-plugins-bad
gstreamer0.10-plugins-ugly
gstreamer0.10-plugins-bad-multiverse
gstreamer0.10-plugins-ugly-multiverse
icedtea6-plugin
libavcodec-extra-52
libmp4v2-0
ttf-mscorefonts-installer
unrar

Basically, it’s a bunch of fonts, codecs (so that you can play patent-encumbered media files), and the ability to open .rar compressed files and use Java applets in the browser. It’s some handy stuff, but because it’s all non-free Ubuntu doesn’t include it by default. Indeed, you won’t even find it unless you enable the ‘multiverse’ repository, like so:

Then, you’ll need to make sure that your system knows (though some more modern releases will do this automatically) about the new software choices.

Follow that up with:

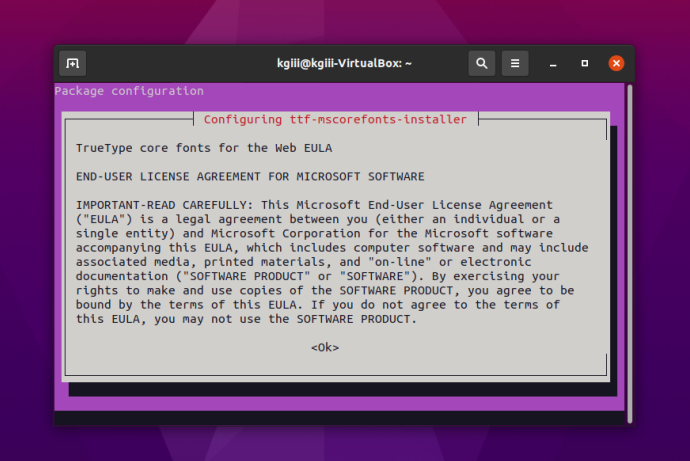
That’s going to download a bunch of stuff and show a screen that trips up a lot of newer users. There’s no obvious way to use a mouse and, indeed, you have to use your keyboard to agree to the user agreement. It looks like this:

accept the eula
Yes, you have to agree to proceed.

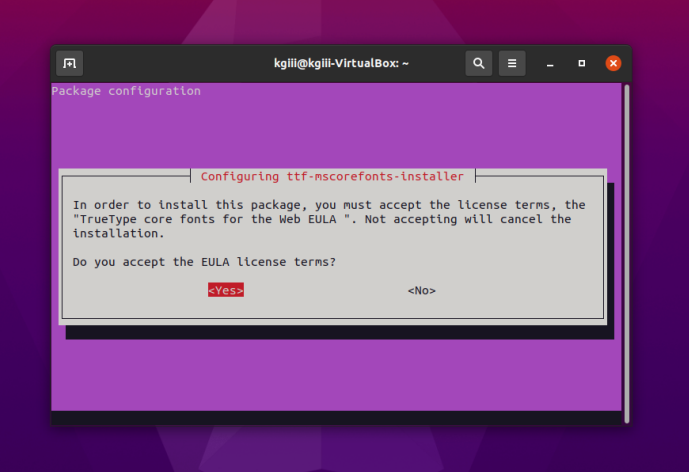
It’s okay. Don’t give up! You can use your TAB (or arrows) key to make selections and use the ENTER button to submit your answers. You’ll do it again on the next screen.

more eula
Use the tab or the arrow keys and the enter to agree.

At that point, it’ll download some more files with fonts in them and extract them to the right directories so that you can use them. You’ll also be able to use the other included files/applications, though they are not ‘free’ in the sense of the license agreement (which is the reason they’re not included by default and you have to jump through hoops to install them).

Smash a Button
[Total: 1 Average: 4]
About Me: I'm just some retired dude with a little bit more free time on my hands. If you want to support the site, why not help yourself out too by ordering some inexpensive web hosting so that you can start your own site?


Linux Tips
Creative Commons License
This work is licensed under a Creative Commons Attribution 4.0 International License.
SITEMAP